Point! Shoot! The Basics of Photography
WHAT IS A GOOD PHOTO?For many people who only rarely pick up a camera, a "good" photo is one where you can recognize what the subject is, such as this photograph of the Flying Kiwi blowing bubbles when he was still young, rosy-cheeked and somewhat innocent. For such people, the photograph is mostly a reminder of a person or an event or an experience, and the real pleasure comes from the emotions which are connected with the event and brought back by seeing the photograph. The technical aspects of the photo, even whether it's properly focused, are secondary and might not even be noticed. This approach to photography is perfectly valid, but it's also very limiting, since only people who have shared the original experience will enjoy the photograph. What would be better is a photograph with enough power to arouse emotions in people who weren't around when the shot was taken. Most beginners think that to get good photos you must have a good camera, and many go one step further and assume that if you have a good camera then you'll certainly get good photos. This is a big mistake. It's true that some specialized types of photography such as macro photography or sports photography require expensive equipment, but experienced photographers realize that what's most important is not the camera, but the person behind the camera. There have been whole art exhibitions devoted to photographs taken using mobile phone cameras, and even pinhole cameras which consist of nothing more than a shoe box with a tiny hole punched in the front and a piece of film stuck to the back! So a good photo is one created by a person who can see interesting things and can capture them without burdening the viewer with unnecessary stumbling blocks like a lack of focus. To achieve this technical skill it's necessary to reach a certain basic level of competence with whatever camera you're using, so that defects in the photo won't stand in the way of its enjoyment. A photo which is technically faultless might be very boring - probably most technically faultless photos are boring - but it doesn't put distractions in the path of someone looking at the shot, and some level of technical proficiency is certainly needed before you can consistently start taking photographs which other people will appreciate. This essay describes some of the most basic principles which apply to any type of photography and any type of camera; the next essay describes more advanced techniques. In the end, however, technique is only a means to an end, and your photographs will only have power to move other people if you personally are enthusiastic about the thing you're photographing. If you can find a different way of looking at it than most people, then your photography might even become great. |
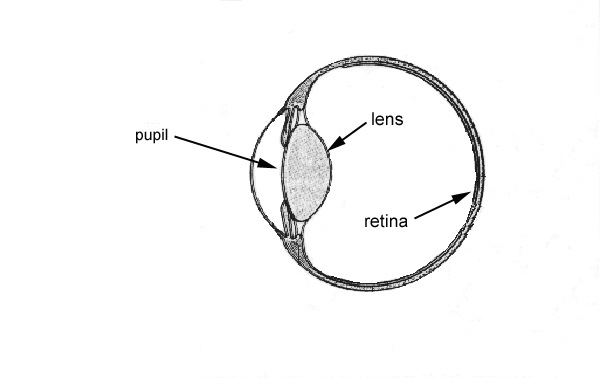
HOW A CAMERA WORKSWhen your eyelids are open, light enters your eye through a circular hole called the pupil and is focused by a lens onto the light sensitive retina attached to the back of the eye. The size of the pupil can be adjusted to allow more light to enter when the environment is dim, and less light when it's bright. There are about 126 million sensory cells in the retina, both cone-shaped cells which are color-sensitive and rod-shaped cells which aren't color-sensitive but can detect low levels of light, useful for night vision. Most cameras work in the same way as the eye - when the shutter is open, light enters a roughly circular hole called the aperture and is focused by a lens onto a light sensitive medium at the back of the camera, either film or an electronic sensor. Some types of camera, like a pinhole camera, don't have a lens, and some digital cameras don't have a shutter; nevertheless, understanding how these things work will help make your photographs better. |
CONTRASTAnother area where problems arise because cameras differ from the human eye is in the area of contrast, which is a measure of the difference between the dark parts of a scene and the bright parts. Outside in the fresh air there's usually about 200 or 300 times as much light as inside a normal room, even on a cloudy day. The human eye can easily handle this much variation (called contrast), but cameras cannot. Because most people don't realize this it's easy to end up with photos where some parts are underexposed and other parts are overexposed, for instance if you take photos of people in bright sunlight. If they are facing away from the sun, then their faces might be too dark while the rest of the shot is OK; if they are side-on to the sun then one side of their face might be too dark and the other side too bright. It's often better to take the photo with them facing the sun or, even better, by waiting for a cloud to pass overhead and put everything into shadow. One way to deal with contrast is to ensure that the sun is always behind you. If it's directly behind you then any person you photograph will probably be squinting, and pictures of architecture or landscape might come out a bit flat and shapeless, but if the sun is behind your left or right shoulder then you'll most often have everything in your photograph bathed in roughly the same amount of light, which will minimize your problems with contrast. Not shooting into the sun will also eliminate any risk of flare, which refers to circles or polygons of light scattered in a line across your photo, caused by the sun or some other bright light shining directly into the lens and creating reflections of the aperture on the glass of the lens. Since many lenses have 5 or more separate pieces of glass inside, you can end up with many of these polygons on the photo. Sometimes this can enhance a picture, but much more often it ruins it. |
COMPOSITIONThe term composition refers to the way you place the elements of the photo in relationship to each other. By paying attention to some simple principles of composure, you can take the first steps from taking pictures which are merely technically proficient to ones which other people will think are interesting. The simplest thing you can do to make a photograph of something more interesting is to fill the frame with the subject. This removes irrelevant abstractions from the shot and forces the viewer to confront the interesting peculiarities of the thing that you've photographed. If the person or the plane or the bird which is the subject of the shot only occupies a small percentage of the photo, it won't have much impact - a person whose feet are at the bottom of a horizontal photo and whose head is at the top will only occupy about 10 or 15% of the shot, and will have to compete for attention against 85 or 90% extraneous background. There are certain rules to follow when composing photos of different types of subject. For instance, if you're photographing people, be nice to them; don't put a power pole through grandma's head, don't cut off the top of aunt Selma's head, and don't cut off her feet, unless you also cut off her legs and hips! If you're photographing a landscape or anything which has a horizon visible, make sure that the horizon is horizontal - after all, that's where the word "horizontal" comes from. This last rule is especially true if there's a large body of water in the photo - if that picturesque sailboat looks like it's sailing uphill, then the photo isn't going to look right. On the other hand, if it's a building or tall trees that you're photographing, make sure that vertical lines stay vertical. |