Bug Macro Photography
The EquipmentMost insects are small, so you'll need equipment to magnify them. You can use a long lens with close focus of less than 10 feet, fit a diopter lens to the front of a regular lens, fit macro extension tubes between a lens and the camera body, or use a dedicated macro lens. Long lenses with focal length of at least 300mm have the advantage that you can take a photo while still at a distance from the insect, which makes approach much easier. Extension tubes are simply hollow tubes with no glass in them which are mounted between a regular lens and the body of the camera. The effect is to reduce the minimum focus distance of the lens - if the lens previously could focus no closer than 10 feet, then with extension tubes it might now focus as close as 5 feet. They come in different sizes and can be stacked on each other; since there's no glass involved, there's also theoretically no degradation of the image. I've never used diopter lenses so I can't comment on them. |
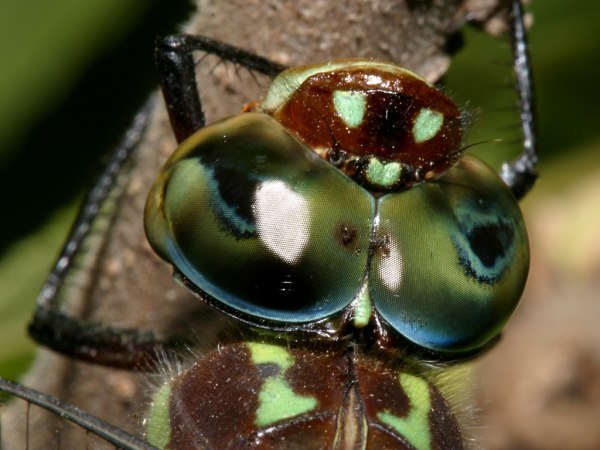
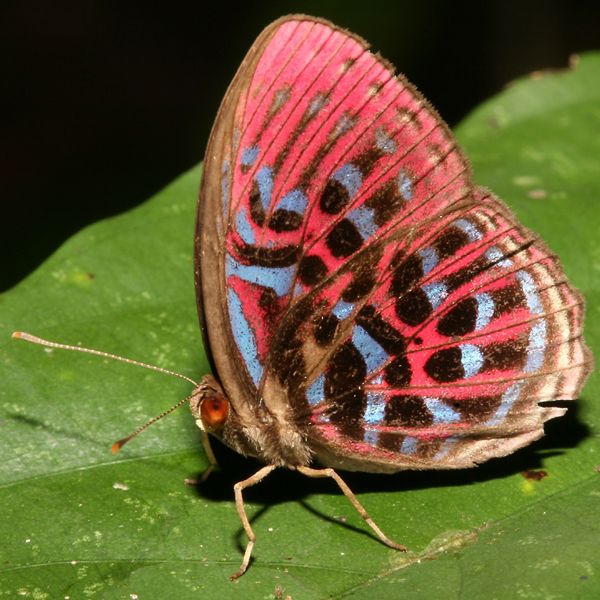
However none of these approaches to increasing magnification can compete with a dedicated macro lens. These lenses are typically the sharpest and clearest lenses in any manufacturer's inventory - other lenses will be longer, more expensive or faster, but because of the obviousness of any optical aberrations in a macro photo, the macro lens will have the best optical characteristics of sharpness and clarity - something which makes them fairly unsuitable for portrait photos, since they'll show up every fault of the subject! When pointed at an insect, such a lens can show up the very fine details like the hairs on the body, facets of the lens of the eyes and scales on the wings. The downside is that these lens typically focus very close, so the end of the lens might be only 100mm (4 inches) from the insect, which is why you'll have to read a later section on this page which is entitled stalking your prey! Macro lenses typically come in a variety of lengths, with 50mm, 100mm and 200mm being the most common. A 200mm lens allows you to get a superb shot while further away from the insect than a 100mm lens, but it'll also blow a nice hole in your wallet, and the very distance might make it difficult to get shots from certain angles. |
LightingAn early choice you'll be faced with is whether or not to use a flash. Insect photographers tended to be very strongly polarized between those who insist on taking photos with only available light, and those who use flash on almost all of their photos. There are a few souls who make an effort to balance available light and flash, but they're definitely in a minority. For the record, I fall into the flash camp and all of the photos on this page were taken using flash! The primary issue in The Great Flash Debate is depth of field. Whichever approach to insect photography you take, you'll find that it's very difficult to get an entire insect sharply focused - either the head is focussed or the wings. This might seem strange, but it's a consequence of the amount of magnification which you need to fill the frame with your insect. Typically there's only 4 or 5mm (about 1/5th of an inch) of the insect which is sharply focussed, even when you've increased the depth of field as much as you can by stopping down the aperture to the smallest setting it'll go to - typically f32. Those in the flash camp say, "OK, then, I'm going to shoot at f32 whenever I possibly can". But it's extraordinarily rare for there to be enough natural light to do this, so the Flashers use a flash to provide that light. Sure enough, they get the maximum depth of field, but at a cost - sharp shadows and dark backgrounds, which seem unnatural to many people. The Available Light Crowd consider these things too high a price to pay, so instead of shooting at f32, they set their shutter speed to 1/100th of a second or better, then adjust the aperture to suit the amount of available light and the brightness of the insect - usually meaning they'll get no more than f8 or f16, and often much less, which causes a significant contraction of the depth of field - anathema to the flashers! There are more sophisticated approaches which both sides resort to in order to reduce the deficiencies of their chosen method. Flashers might invest in sophisticated lighting systems, perhaps dual flashes, one mounted on either side of the camera, each of which reduces the shadows caused by the other flash. However, this also results in an unusual double "catch light" in the eyes of the subject - a single catch light is considered attractive, but multiple or strangely shaped catch lights are a distraction. Another approach to lighting is the macro ring flash, which is a donut-shaped light which fits around the lens and is typically mounted at the front of the lens. Since light comes from all angles around the lens, sharp shadows are virtually eliminated; however some Available Light people complain that this now makes the subject too flat! In response, some manufacturers allow the different lighting elements in their ring flash to be set to different power levels, so the bottom elements emit less light than the top elements, producing pleasantly soft shadows underneath the subject. Unfortunately these ring flashes are expensive, and any bulky lighting system will be awkward to carry and maneuver in the heat of a tropical jungle, as well as limiting the positions into which you can put the camera when you want to get an interesting angle; in addition some insects will be freaked out when they see the large assemblage of equipment you're approaching them with. The Available Light Crowd also tries to recover the depth of field they lost, usually by using a tripod. By setting the camera up on a tripod, they can set the shutter speed low enough to get the aperture back up to f32, and so recover all of the depth of field which the Flashers enjoy, but without unnatural shadows. However, using a slow shutter speed will only work if there's no movement caused by wind, and the insect itself is totally static. When you're in the field it can be very hard to judge if there's subject movement, so you'll probably only find out when you see the end result at home. Flashers don't experience this problem, since movement is stopped not by the shutter speed, but by the brief duration of the flash burst itself - typically the flash only fires for around a millisecond or so, freezing all motion just like a stroboscope. Another problem experienced by people using tripods for macro photos of insects is that they're often found under the forest or jungle canopy. In this dark environment you might need an exposure of 30 seconds, which will almost certainly result in motion blur. Additionally, using a tripod suffers from the same problems caused by sophisticated lighting equipment - lack of mobility, and subject panic leading to subject flight! An additional issue for Available Light photographers is white balance. There's no problem if the bug is sunlit, but if it's in shadow then the colors will appear flat. You can try compensating for this by adjusting the camera's white balance, but probably the better approach is to use just a little bit of flash, by putting the flash unit onto 1/16th power, to "pop" the colors without creating harsh shadows or a dark background. This is the approach I use when photographing fungi, tripod plus a small amount of flash, but of course fungi don't move when you try to photograph them! |
Basic PrinciplesAs with all animal and people photography, you should almost always ensure that the insect's eyes are in focus, unless you're specifically taking a photo such as part of the wing. It's best to focus manually on off-center subjects, because the depth of field is so shallow that if you place the subject on an auto-focus point, focus and then recompose the shot, you'll now be unfocussed because of tiny misalignments as you swivel. It's usually easier not to auto-focus at all, but to manually focus and to make the final focus adjustments not by turning the focus ring on the lens, but by very, very gently rocking your head backwards and forwards. Regardless of what equipment you use, you'll have to deal with shallow depth of field. One way to get the entire insect in focus is to start thinking of insects as two-dimensional creatures, which means photographing them either fully side-on or top-down. Of course it can be boring if every photo is shot from those viewpoints, so try also to get close-up angled views of the head and body. As I explained on the intermediate principles of photography page, depth of field is affected by the aperture setting which you use, with greater depth of field with higher aperture (f-stop) numbers. Depth of field is also affected by the distance of the camera from the subject - the further away the camera is, the greater the depth of field will be. So to achieve greater depth of field, you could take the shot from further away and then crop the result so the subject still fills the frame. It's easier to get greater depth of field with most digital cameras than with a film camera, even though there's no inherent difference between photographing with film and photographing digitally. However, since all early digital cameras had a smaller photo sensor than 35mm film, they were effectively cropping the result at the time the shot was taken (the so-called "field of view crop" or "focal length multiplier" effect), and so people with digital cameras tended to take photos from greater distances than film photographers, creating greater depth of field. However, a digital camera like the Canon 1Ds with the same size sensor as 35mm film will produce photos with exactly the same depth of field as a film camera. The second reason why digital cameras with small sensors can get better depth of field is related to the focal length of the lens; the shorter the focal length, the greater the depth of field. This doesn't help digital cameras which use the same lenses as 35mm film cameras, but digital cameras which have lenses specifically designed for the sensor (no "field of view crop") can achieve much greater depth of field. Since the sensor is smaller than 35mm film, the same field of view is achieved by using a shorter focal length. So on a digital point-and-shoot camera like the Canon G2, which has a "35mm equivalent" zoom lens of 34-102mm, the actual focal length of the zoom is 7-21mm, which is extraordinarily short by 35mm standards. Unfortunately, the G2 doesn't have a good macro mode, but on the many point-and-shoot digital cameras which do, a 7mm focal length will give much greater depth of field than a 100mm macro lens. The same is true for SLR lenses which are matched to the sensor size, such as the Nikon DX series, which can't be used on Nikon 35mm cameras, however the difference in focal length is less pronounced than for point-and-shoots (a DX 17-55mm lens is the equivalent to a 35mm 26-86mm lens), and at the time of writing in the middle of 2004, Nikon hadn't produced a DX macro lens. This is one area in which point-and-shoot digital cameras actually have an advantage over their SLR cousins. At the time of writing, many point-and-shoot cameras also had an advantage in resolution, with 8 megapixels compared to the 6 megapixels of most SLRs. However, the noise levels of the point-and-shoots tended to be worse than the SLRs, partly because of smaller sensor size (and therefore smaller pixel size), but also because they were cheaper than SLRs and therefore less well engineered. |
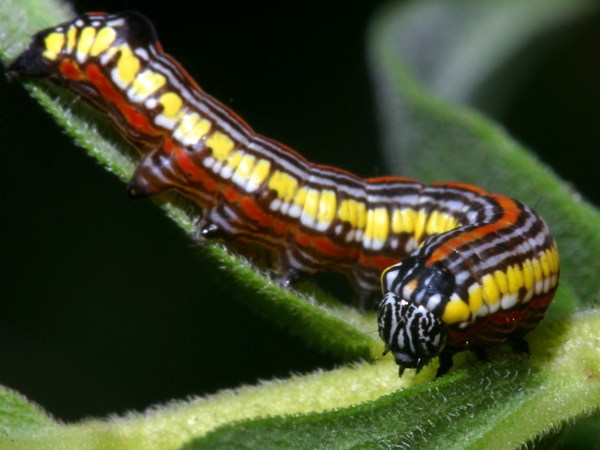
Stalking your PreyInsects are mostly small, and a surprising number of them want to avoid being eaten. These two factors lead to one of the greatest problems facing insect photographers: finding your subjects. Some insects such as Monarch butterflies are deliberately colored to be highly visible, in order to warn would-be predators that they taste noxious; however, most insects rely on concealment and flight to escape their enemies, so you need good powers of observation to find them. If you're walking through an area with trees, or even lots of leafy plants, then you'll soon realize that it's like looking for a lot of needles in a huge haystack. If you walk at normal speed, then you'll miss at least 90% of what's out there, so it makes very good sense to slow right down. If there's interesting habitat on both sides of a path you're walking down, then concentrate on just one side at a time, and you'll probably see more than if you split your time between both sides. You'll also get more and better insect photos if you concentrate on places where it's possible to take photos! There might well be butterflies on the tops of leaves halfway up a tree, but you can't take a good photo of it up there, so you're better off looking at head-height and below. In the same way, if you keep the sun behind you as much as possible, then not only will searching be easier on your eyes, but you won't have problems with backlighting when you find something. If the insect you've found is shy, then the single most important skill you need is to be able to move very slowly towards it. This might mean taking only one small, slow step every 15 or 20 seconds if it's a very jumpy critter like a butterfly, dragonfly or some types of beetle. It's not at all unusual for a dedicated insect photographer to spend 10 or 15 minutes stalking a single insect before even starting to take photos, and many times the prey will escape before any shots are taken! When you're moving towards the insect all of your movements need to be slow and smooth, which includes moving the camera slowly and smoothly up to your eye. You can obviously see that it's a pretty anti-social form of photography, and could be downright embarassing to significant others if you have to crawl belly-down in public places to reach your target! Another good idea when approaching insects is to avoid having your shadow move across them, since this will often make them fly away. If you move slowly enough and carefully enough then the payoff is that you can sometimes get amazingly close to the insect. If you've done it right, then even jumpy butterflies will sometimes allow you to manipulate their perch in order to get a better angle or backdrop for the photo. I always carry a small pair of nail scissors with me, so I can trim away blades of grass and small twigs to get an unobstructed photo.
Here are some specific hints for photographing different varieties of insects:
Dangers
OK, it's true that there are poisonous spiders and caterpillars, and flesh-eating botflies, but perhaps the greatest danger to which insect photographers are subjected is a greatly expanded sense of beauty and wonder. Almost any tiny critter looks extraordinary if it's magnified enough, and soon you'll start to see the amazing beauty of unlikely subjects, like caterpillars, beetles and spiders. Unfortunately, while you change your mindset those around you will continue to see only loathsome "bugs" and they won't be able to understand why you waste your time on such things. On the other hand, they probably will be impressed by photos you take of butterflies, dragonflies and other socially acceptable critters! |