Beyond Pointing and Shooting

Before reading this article, make sure you understand the principles described in the earlier article called Point!  Shoot!

LIGHT

Photography is all about capturing light, but not all light is created equal.   Landscape photographers in particular talk about the "golden hour" around sunrise or sunset when the sun is low on the horizon and the light contains more yellow and red than usual.   Unfortunately the golden hour is often more like a golden five minutes, so you often have to move fast to make the most use of this very warm illumination.   It's sometimes possible to compensate for the lack of good light by using filters, such as "warming" filters which can enhance a sunset or even a normal daytime photo.   However, it's very easy to overdo this effect and end up with something which looks artificial.  Using a warming filter is definitely a matter of taste, but there are two types of filter which you should consider buying for every lens in your collection.

The first essential filter is a skylight or its close cousin the UV filter.   The latter in particular is said to reduce the amount of haze in photos taken of distance subjects such as landscapes, but perhaps a more important reason to have one of these filters on the front of every lens you own is that they reduce the risk of damaging the front glass element of the lens.   I've twice dropped lenses onto hard surfaces and had my heart sink when I've seen the front piece of glass smashed, only to discover with relief that it was the skylight which was broken, leaving the lens in perfect condition.   Less dramatically, a skylight or UV filter will also reduce the number of scratches which the lens receives.

The second essential filter is a polarizing filter.   These work exactly like polarized sunglasses, dramatically cutting down haze and intensifying the colors of the photograph.   They are particularly effective for photographs of the sky, turning it a deep blue and adding contrast to any clouds.   They also have a very good effect with water, eliminating most of the reflections and making things under the surface, such as a coral reef, much more visible.   There are two types of polarizing filter, linear and circular; if your camera has auto-exposure and auto-focus then you probably need to buy a circular polarizer, because the linear polarizer will probably interfere with these functions.   The dramatic results which this filter gives you comes at a cost - you'll lose up to two stops of light when using a polarizing filter.   For landscape photography this is usually affordable, but for airshow photography it's usually too high a price to pay, since the fast shutter speeds required usually mean that the aperture is already opened about as wide as it can go.   Although two stops is usually accurate, the exact amount of light you lose depends on how effectively the filter is doing its job, which in turn depends on two things - its orientation relative to the scene you're photographing, and its orientation to the main light source, which is usually the sun when you're outside.

Whenever you use a polarizing filter you should rotate it after pointing at the subject you want to photograph.   As you rotate the filter, you'll actually see in the viewfinder the difference it's making; when the scene seems darkest, that's when it is having most effect, so you should take the photo with it in this position.   In addition, a polarizing filter isn't equally effective in all directions, instead it has most effect when it's at 90 degrees to the sun or other dominant light source.   Put your thumb and first finger at right angles to each other;  if you keep your finger pointed towards the sun and at the same time rotate your wrist, the directions to which your thumb can point will be the directions where the filter will have most effect.   If you point the lens directly towards the sun or directly away from the sun then the filter will have no effect at all.

There are several problems associated with using polarizing filters with wide angle lenses.   Since the filter's effectiveness varies depending on its orientation to the sun, part of the sky will be deep blue and parts will be lighter blue, which looks strange in the final photo.   Very wide angle lenses usually have a large diameter filter screw, and large diameter polarizing filters are very expensive.   Worse yet, many very wide angle lenses don't have a filter screw at all, and the front element of the lens is often very convex, making it physically impossible to attach a screwable filter on the front.   Another difficulty which happens even with lenses which are only of medium wideness is vignetting, which refers to the corners of the photograph becoming dark and underexposed.   This happens because the filter itself blocks part of the light entering the camera.   If the polarizing filter is mounted on top of a skylight then the problem becomes even worse, and you might need to remove the skylight and just use the polarizing filter on its own.

Apart from its briefness, another difficulty with golden hour photography is that while the light is superb, there often isn't very much of it.   In order to get enough for a proper exposure, landscape photographers usually have to use a slow shutter speed.   Since sharpness is a highly desired goal of landscape photography, this typically means using a tripod, since handholding the camera at a slow shutter speed is likely to cause blur.   Tripods are also a vital accessory if you're doing night photography of cities, indoor architecture, or one of my own specialties, aircraft museums.

Luckily, tripods are one of the few items of photographic equipment which are standardized across all manufacturers, so any brand of camera will fit without problems on any brand of camera tripod.   The purpose of a tripod is to reduce vibration caused by the motion of your body during a longer than usual exposure, but how can you take the photo without introducing vibration when your finger presses the shutter release on the tripod-mounted camera?   There are two main ways, either (1)  a remote control like a cable release which is physically connected to the camera or a wireless remote control which works like a TV remote control or (2) use the camera's self-timer to automatically release the shutter when the vibrations have died down after you've pressed the shutter release.   The self-timer is obviously cheaper and less fussy to use, but you have less control over the exact moment when the photograph is taken, and a cable release is much better when you put the camera into bulb mode to take a really extended exposure of 15 seconds, 30 seconds, or longer.
   Another source of vibration which affects a camera on a tripod is called mirror slap, which occurs when the mirror inside an SLR camera swings up as the shutter is released, directing light away from the viewfinder and towards the film or digital sensor.   This is most often a problem when you're using a telephoto lens and is usually worst when the exposure is around 1/10th of a second in duration, plus or minus about 2/10ths of a second.   The solution in this case is to enable the camera's mirror lockup feature; you first compose and focus the photo, then engage mirror lockup and then a few seconds later, after the mirror slap vibrations have died down, the camera automatically takes the photo.

Exposure compensation is a technique which should be in every photographer's repetoire of tricks.   It means overriding the camera's decision about the correct exposure for the photo, and telling the camera to let either more or less light in than it would otherwise have done.  Exposure compensation is needed because all automatic cameras' exposure systems try to turn every photo to the equivalent of 18% grey, which is the shade of grey 18% of the way from pure white to pure black.   Most of the time this is appropriate, but if the subject is very bright or very dark then there's a high probability that the camera will choose the wrong exposure.   If your subject is a black bird like a raven, then the camera is likely to turn it to 18% grey and everything else will be grossly over-exposed.   On the other hand, if you're taking a photo in snow, or doing airshow photography, then the camera will try to turn the snow or the sky to 18% grey, and everything else will be severely under-exposed.   In fact, dark subjects should look dark and bright objects should look bright, so when photographing the raven you should dial in negative exposure compensation to tell it to underexpose the shot, and when shooting scenes with snow or lots of sky then you should dial in positive exposure compensation to tell the camera to overexpose the bright subject.   Typically you would dial in around one stop (i.e. -1 or + 1) of exposure compensation, or occasionally two stops if a lot of compensation is required.

FLASH

Sometimes there just isn't enough natural light available to take a photograph, and you have to resort to a flash to provide the necessary illumination.   Unfortunately, this is far from a free ride, and there's quite a lot of technique involved in getting a good looking photograph while using a flash.   Some of these techniques are relatively simple, like never pointing the flash directly towards a window, mirror or other reflective surface, in order to avoid very strong reflections from appearing in the photo.   Also, most people know by now that flash has a very limited range and won't help at all if you're taking a photo in a large sports stadium.   However other techniques for using flash require a lot more thought.

The main problem with flash is that it creates very "hard" shadows, much like strong sunlight.   This is a problem in almost all photos, but it's particularly bad when you're taking portraits of people, and it's especially bad indoors, because the walls make the shadows much more visible than they would be outdoors, say in a forest.   The easiest way to deal with harsh shadows indoors is to use bounce flash, which can only be done with a flash which has a tiltable head, or with a flash which can be fired remotely, while it's not in the hotshoe on top of the camera.   In either case, take the photo with the front of the flash pointed towards the ceiling (or a wall, if that's more appropriate), rather than directly towards the subject.  Instead of illuminating the subject from a small point source, the light will bounce off the ceiling and the walls from many directions, reducing the shadows or eliminating them completely.   Professionals often use a white umbrella for this purpose, and multiple light setups are also a staple of studio photography.   Amateurs who don't want the expense or inconvenience of carting around the professional's studio equipment can use diffusers such as embossed clear plastic fittings which fit in front of the flash, or pieces of white cardboard above and in front of the flash, or relatively cheap commercial units like the Stoffen Omnibounce which fit over the front.   Even a handkerchief placed over the front of the flash can be used to soften the light.

Another problem with flash which most people know about is red-eye, or its animal equivalent green-eye.   In the case of humans, red-eye is caused by light being reflected off the veins crossing the surface of the retina (the brain filters this out so we're not aware that these veins are there); in animals the reflection is caused by a reflective layer called the tapetum which enhances night vision.   This effect is strongest when the flash is directly in line with the lens, so getting the flash off the camera will help a lot.   My preferred solution is to fix the red-eye later in PhotoShop or some other image processing software.   Some cameras perform several pre-flashes to close the subject's pupils, but this can be very distracting for both people and animals.

One essential but tricky technique to learn is how to balance flash against natural light.   This situation arises when you're going to have illumination from both natural light and flash.   Situations when this can occur is when you're photographing a sunlit scene from inside a building or some other dark enclosed space, or when your subject is backlit and the side facing you is in deep shadow and needs to be made brighter.   The trick to balancing the flash and the natural light is to set the camera so that the sunlit part of the scene will be correctly exposed, and then adjust the flash output so it doesn't overwhelm the area you want it to illuminate.   For instance, if the surrounding landscape needs a shutter speed of 1/125th of a second and aperture of f16, adjust the camera to these settings and then enable the flash.   If the camera has effective through-the-lens (TTL) metering, then you can allow the camera to first switch on the flash and then switch it off once the correct amount of light has hit the subject.   If you don't have TTL metering, or it's not working very well, then you can use flash exposure compensation to reduce the amount of light emitted by the flash, in the same way that regular exposure compensation can be used to adjust an exposure.   Finally, if your flash allows you to manually adjust the amount of light it outputs, then you can use this to balance the lighting.

Night fill flash adds another complexity to this technique.   If you want to photograph a person against a brightly lit cityscape, then you'll need to set the camera on a tripod and set it to correctly expose the background - often this will require a shutter speed of several seconds.   Then have your subject stand in front of the camera, illuminate them using fill flash, and continue to leave the shutter open long enough to properly expose the background lights.  Of course you'll have to tell your subject to stay perfectly still while the camera shutter remains open.

The shutter mechanism in most cameras consists of two "curtains".   When you release the shutter, the first curtain starts moving and exposes the film or digital sensor to light coming through the lens, then near the end of the exposure the second curtain starts moving and blocks the light once again.   If it's a long exposure, then there will be a period of time when the entire piece of film or the entire sensor is exposed to the light, but if it's a short exposure (say 1/500th of a second) then both curtains will be moving, one after the other, and at any one moment only part of the sensor will be exposed to the light.   Most flash units can only be used when the entire sensor is exposed, which means that there's a definite limit to the maximum shutter speed which you can use with flash.   If you want to use a telephoto lens and flash to illuminate birds or other wildlife, then the maximum flash sync speed might be an important factor when you're buying the camera, since you'll need a high shutter speed to prevent ambient light from producing visible camera shake.   Some cameras only allow flash at 1/90th of a second or slower, while high-end units might let you go up to 1/500th of a second.   High-speed sync is a feature where the flash pulses on and off many times during the course of the exposure, allowing the flash to be used at even very high shutter speeds.   However, much of the light falls on the lens side of the curtains rather than hitting the film or sensor, which means that much less illumination is provided for the photograph.

There are occasions when flash illumination provides benefits over regular lighting.   For instance, the duration of a flash is extremely short, around a millisecond or less, so it can be used to stop action while still providing plenty of light.   A classic example of this is photographing hummingbirds in flight at a flower or a feeder.   The flash not only provides enough light to close down the aperture and get lots of depth of field (see below), but it completely freezes the motion of the bird's wings and illuminates blur, and, if you make the flash the dominant illumination then the background will be completely dark, separating the bird completely from any distractions in the background.
    Another benefit for both wildlife photographers and portrait photographers is the catchlight which the flash creates in the subject's eyes.   This is a bright spot on the eye, which gives a feeling of life to the subject - photos without a catchlight often look a bit dead to the trained eye.

If you're using flash to illuminate a moving subject then it's helpful to know about first curtain and second curtain operation.   In brief, this refers to the timing of the flash burst relative to the curtain movement.   In first curtain operation, the flash is fired as soon as the first curtain has finished moving, and before the second curtain has started moving.   In second curtain operation, the flash is fired just before the second curtain starts moving.   This is important in situations such as photographing a stockcar in a floodlit stadium at night using a tripod, where lighting is partly provided by the flash and partly by the floodlights.   If you use first curtain synchronization then after the flash has finished, ambient light will continue to illuminate the car, creating a blur in front of the image of the car which was magically halted by the flash.   If you use second curtain synchronization then the ambient light will create a blur behind the frozen image of the car, which gives an interesting impression of speed and generally looks better.   It's always seemed to me that second curtain operation is more useful, but for some reason most camera manufacturers default to first curtain.

DEPTH OF FIELD

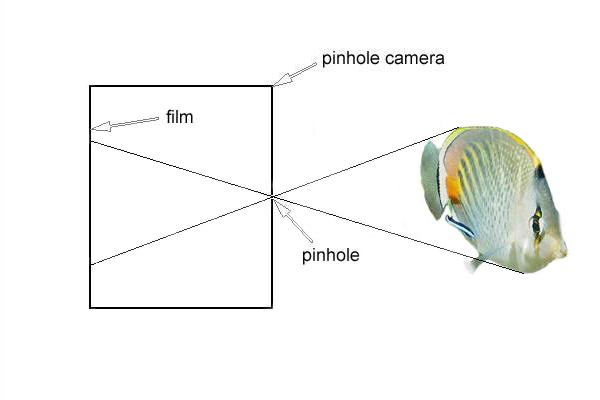
The simplest type of camera is called a "pinhole camera".   It consists of a box with film on one side and a single small hole on the side opposite the film.   There's no lens, and the "shutter" is often just a piece of cardboard or tape which is used to block the pin hole.   Since the pin hole is often very small, not much light can enter the camera and an exposure often takes several seconds or even minutes to complete.  Since it's so simple, it's a very useful tool for understanding how a regular camera works.

As you can see, a beam of reflected light from the top of the fish would pass through the pin hole and hit the film near the bottom; in the same way, a beam of light from the bottom of the fish would pass through and hit the film near the top.   The image of the fish created on the film would therefore be upside-down, and it would also be inverted left-to-right.   This also happens with regular cameras, and even with the human eye - but the brain automatically uninverts the image for us!

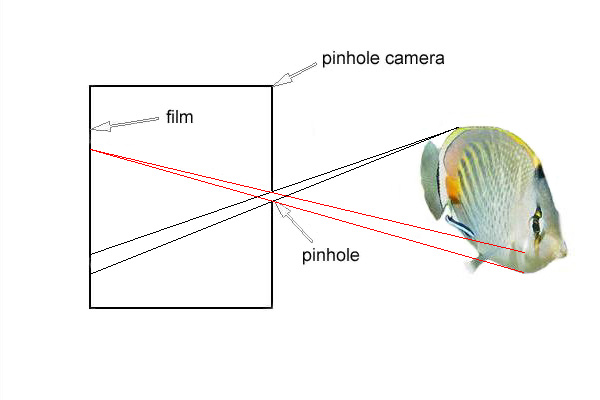
An interesting thing happens if we make the pin hole bigger.   As the black lines show, light from the same point can hit the film at different places.   In the same way, the red lines show that light from different points on the fish can hit the same point on the film.   In either case, the result is blurring of the image.   Light from the same point on the fish hits a circular area on the film, creating a so-called circle of confusion.   The larger the hole, the larger the circle of confusion, and the blurrier the photo becomes.

What's true for pinhole cameras is also true for other cameras.   If the lens on a regular camera is set to focus at 10 meters, then everything which is exactly 10 meters from the camera will be clearly focussed.   However, everything which is less than 10 meters or greater than 10 meters away will be less focussed, and the larger the aperture, the less focussed they will be.   The size of the aperture therefore directly determines the depth of field, which is the depth of the viewed image which is well-focussed.   If all other things are equal, then a lens which is set to f4 will always have a "shallower" depth of field than the same lens set to f22.

A "deep" depth of field is almost always very desirable for photographs such as landscapes, architecture and insect photographs.   However, there are situations in which shallow depth of field has advantages; the most common is for portraits of a person's face or an animal's head.   In these situations, having the background blurred out of existence often adds a lot of impact, by removing distracting elements from the photo.

Insect photography is one specialized area where photographers constantly struggle to get more depth of field.   Insects are often very small, so insect photographers rely on special equipment such as extension tubes or macro lenses which allow the camera to focus closer than it would normally be able to.   A telephoto lens might not be able to focus on anything closer than 3 meters away from the camera, but a dedicated macro lens can focus on something which is 30 centimeters away, or less.   By getting closer, the insect will appear larger in the photograph, but one also discovers that depth of field is related to the distance of the camera from the subject.   The further the camera is from the subject, the greater the depth of field is, and the closer the camera is, the shallower the depth of field is.   Therefore, if the subject is 20 or 30 centimeters away from the camera, then even a macro lens which is set to f32 might have only 3 or 4 millimeters depth of field.   This is why macro photographers will often use a tripod or flash to decrease the size of the aperture and increase the depth of field, even if there's enough light for a normal photograph to be taken without special effort.

The third factor which affects depth of field is the focal length of the lens.   A telephoto lens with a focal length of 300mm or 400mm has a much shallower depth of field than a wide-angle lens of 15mm or 20mm.   The telephoto lens might have a depth of field of only 3 meters for a subject which is 100 meters away, whereas the wide-angle lens might be able to clearly focus all the way from flowers a meter from the camera to mountains several kilometers away.   Many digital cameras have sensors which are smaller than regular 35mm film, which means that they need only very short focal length lens to cover the same angle of vision; since the lens has a short focal length, this means that the depth of field is much deeper than for a 35mm camera covering the same angle of vision.   For instance, a Canon G2 digital camera has a very small sensor and a 7 - 21mm zoom lens to cover it.   This lens covers an angle of vision which is equivalent to a 34 - 102mm lens on a 35mm camera, but because it's the actual focal length of the lens which determines the depth of field, the G2 will have much greater depth of field than a 35mm camera which is shooting exactly the same scene with a 34 - 102mm lens.   As you can imagine, this increased depth of field is a particular advantage in macro photography.

COMPOSITION

As I mentioned earlier, all the good technique in the world won't necessarily create an interesting photograph, but it will prevent an interesting subject from being ruined by unnecessary distractions.   As you master the technical aspects of photographs, you should simultaneously try to develop the principles of composition which will lift your photographs above the average.   This section contains a few random ideas to get you thinking beyond the mechanics of the camera and other equipment.

way to improve the composition of your photographs is not to look at the subject.   Instead, look at the background and take special note of anything which might be distracting.   Examples of this are poles, lines or branches which intersect with the subject, and things which are brighter than the subject.   If you see anything like this, trying moving to one side or the other in order to get the distracting element out of the shot.   For the same reason, shifting your perspective so that you're either lower or higher than head height can remove distractions.   Changing your upwards or downwards orientation often has the additional benefit that it gives a refreshing new perspective on the subject which can enliven even rather ordinary subjects, a technique which is widely used in portrait photography.

One tried and true technique which can make outdoor shots more interesting is to frame the main subject with a tree or some other relevant feature in the foreground to give it depth.   It's also very valuable to give thought to the sequence of events when a viewer looks at the photo.   Most people expect the subject to be at the center of the photograph, so if you place the subject slightly off-center then this adds some amount of interest to the picture, by forcing the person to decide for themselves what is of most interest in the shot.   The "rule of thirds" suggests placing the subject a third of the way in from two edges of the frame.   Lines or curves which are pointing towards the subject are a great way to "lead the person's eye" into the photo and create a more dynamic feeling. 

If the subject is placed diagonally across the frame, this can be more interesting than horizontal or vertical.   This can sometimes work even for normally vertical subjects like people and buildings.   In the same way, if you're putting together a gallery of photographs then try to get a mixture of portrait (vertical) and landscape (horizontal) shots.   This is difficult for some types of photography, such as airshows, since some subjects lend themselves to one orientation or the other.   Another way to lift photographs beyond the ordinary is to abstract out a very small part of the scene or the subject.   Instead of photographing the whole animal, photograph just its eye.   It's easier for a person to apply a mental label to a complete animal and dismiss it as "just a seagull", but photographing the eye and the feathers around it forces the person to actually look at the thing for what it is, and see the beauty which is usually overlooked.

If the subject is moving then you should usually leave more space in front of the subject than behind it so it doesn't look crowded, but has room to move into the picture.   Similarly, if your subject is a person or animal which is looking towards the side of the shot, leave more space in front of its head than behind it, so it has some space to look into.    Flying planes or birds should be placed slightly nearer the top of the frame than the bottom, to give an impression of lift.   If you've got moving water like a river or waterfall, then using a tripod and a slow shutter speed usually gives a much more pleasing blur than a high shutter speed which freezes the water motionless.